
So you want to understand film lighting types and techniques?
BY COLETTE NICHOL, SOLO FILMMAKER & STORY STRATEGIST

First, we need to break down the main film lighting types. And then we need to look at the most important film lighting setups. Lighting for film and video is a huge topic. This article is just a drop in the bucket of what you need to know. But it’s a great start.
When I started out learning filmmaking in 2013, I really had no clue about lighting.
But over time it’s one of the things that I started to focus on. As I got better at lighting my confidence as a solo filmmaker grew. And I also was able to start raising my rates and create work that actually told a story visually.
Lighting is one of the most underused ways to improve your filmmaking, tell better stories, and create films that people enjoy watching.
Film lighting is often also referred to as cinematic lighting. I’ve written a huge post covering all aspects of cinematic lighting. But, this article will be better for you if you want a quick film lighting primer.
Okay, let’s get started!
There are four main types of film lighting.
They’re actually interconnected, so let’s break them down quickly.
FOUR FILM LIGHTING TYPES
- Motivated Lighting
- Realistic Lighting
- Natural Lighting
- Stylized Lighting
MOTIVATED LIGHTING
Motivated lighting refers to any lighting where there is a natural light source within the shot or scene that MOTIVATES the studio light which you’ve added to amplify your lighting.
For example, if your scene has a lamp in it, then you can use the lamp to motivate a studio light that you have just out of frame. To the audience, it looks like your subject is being lit by a warm light. But in fact, the lamp gives off very little light at all, and the subject’s face is lit with studio light.
Windows, computer screens, candles, and lamps can all motivate the use of studio lights.
Making sure your lighting is motivated is one of the basics of cinematic lighting.
Usually, when people talk about motivated lighting, they’re talking about having a window or lamp motivate the studio light. BUT, motivated lighting can also refer to ensuring the STORY motivates the lighting.
REALISTIC LIGHTING
If you’re motivating your lighting then it’s going to look realistic.
You’re going to be able to create a natural feeling that doesn’t look overly stylized. For any film that’s grounded in reality, you want your film to look better than real life but not unnatural.
What do I mean better than real life?
Well, if you’re just shooting your scenes as they come without actually modifying your light or moving your subjects to make the most of the light you have, then your shots won’t be well-composed. In real life, we have terrible lighting all over the place. But in a film, you need to make sure your lighting suits the story and isn’t distracting.
NATURAL LIGHTING
If you’re following the practice of using natural light only then you’re just going to use the sun and practical lights from the scene (lamps, fireplace, candles, etc).
Natural lighting doesn’t mean that you don’t design your lighting. You best believe that cinematographer Emmanuel Lubezki who shot The Revenant designed his lighting setups even though he was just using sunlight, moonlight, and fire.
Fun fact about the sun: it moves!
So when you’re using natural light sources only it becomes even more imperative to design your lighting. You’ll need to know what the movements of the sun will be on the day you shoot and at the location, you’re shooting. Then you’ll design your scenes and the shooting schedule around the sun. You might bring in light modifiers as well to diffuse the light (soften it) or to cut the light. But you can go a long way with just natural lighting.
When using natural lighting it is still critical to know how to place your subjects in relation to the light in order to create looks sculpt the features of the characters and the landscape and create the mood your story needs.

STYLIZED LIGHTING
Truly stylized lighting doesn’t need to be motivated by a light source like the sun or a lamp. But it still needs to be motivated.
All lighting must be motivated by the story that you’re trying to tell. The plot of your film must be elevated by the story your lighting is telling.
Make no mistake, your lighting is telling a story. But is it the story you want it to tell?
When you’re creating lighting looks that are totally stylized, you can focus on the feeling, mood, and emphasis without being too concerned about making it look “realistic” or natural. Think about film noir and many of Tarantino’s latest films.
These are shot in a stylized manner with stylized lighting. As an audience, we don’t care where the lights coming from as long as it fits the feel of the piece and tell a story that elevates the plot.
LIGHTING PLACEMENT
There are three essential lighting zones or placements that you need to know in order to create a basic lighting setup.
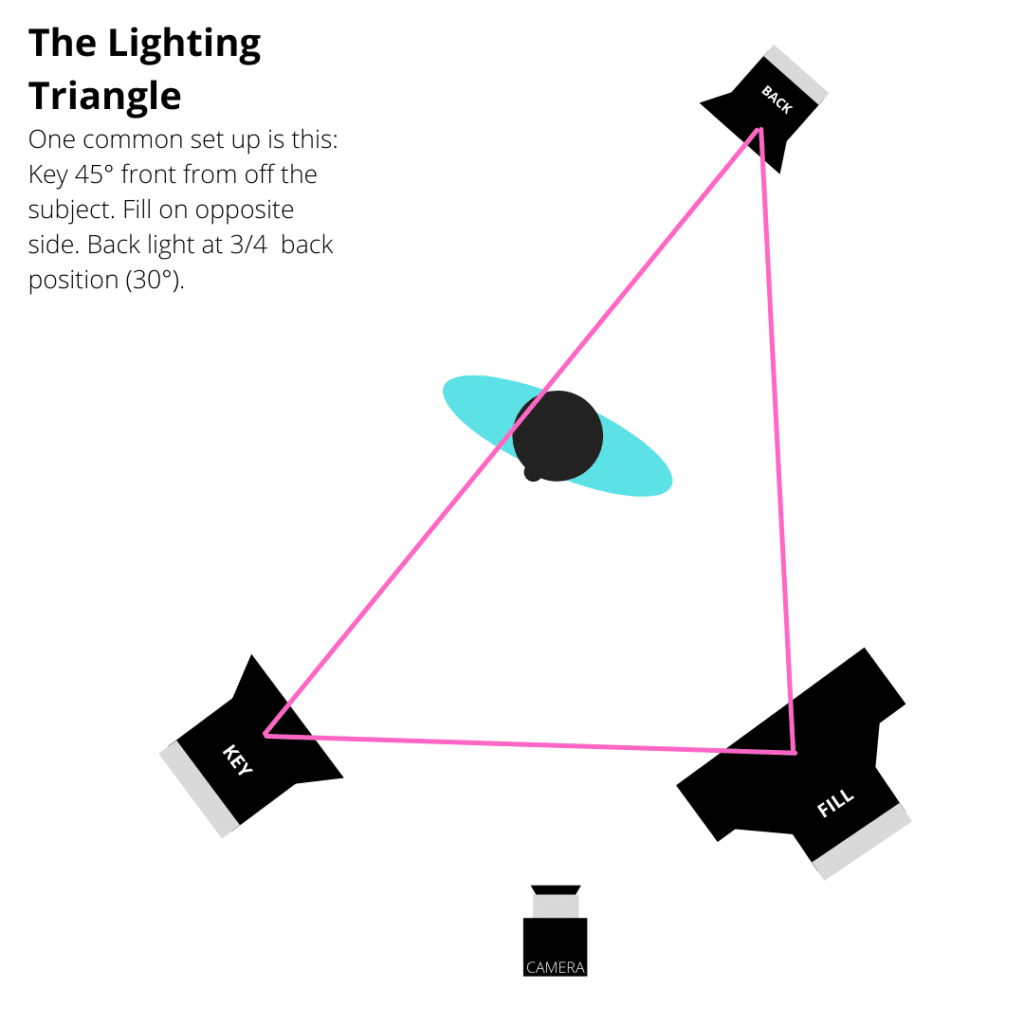
These three lights create a triangle. And you can use this triangle to light basically anything.
- Key light
- Fill light
- Back light
KEY LIGHT
Your key light is the main light in a scene.
It’s what creates the primary shadows on your subject’s face and body. This key light is also what decides the feeling of the lighting for the most part.
For example, if you place your key light behind the subject, you’ll create a more dramatic look. Whereas, if you place your key light right in front of the subject, you’ll create a flat look.
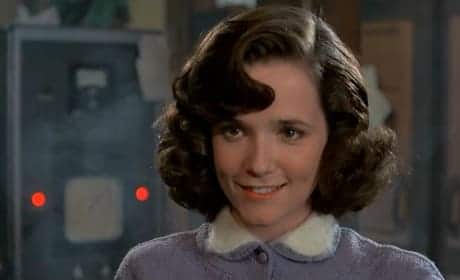
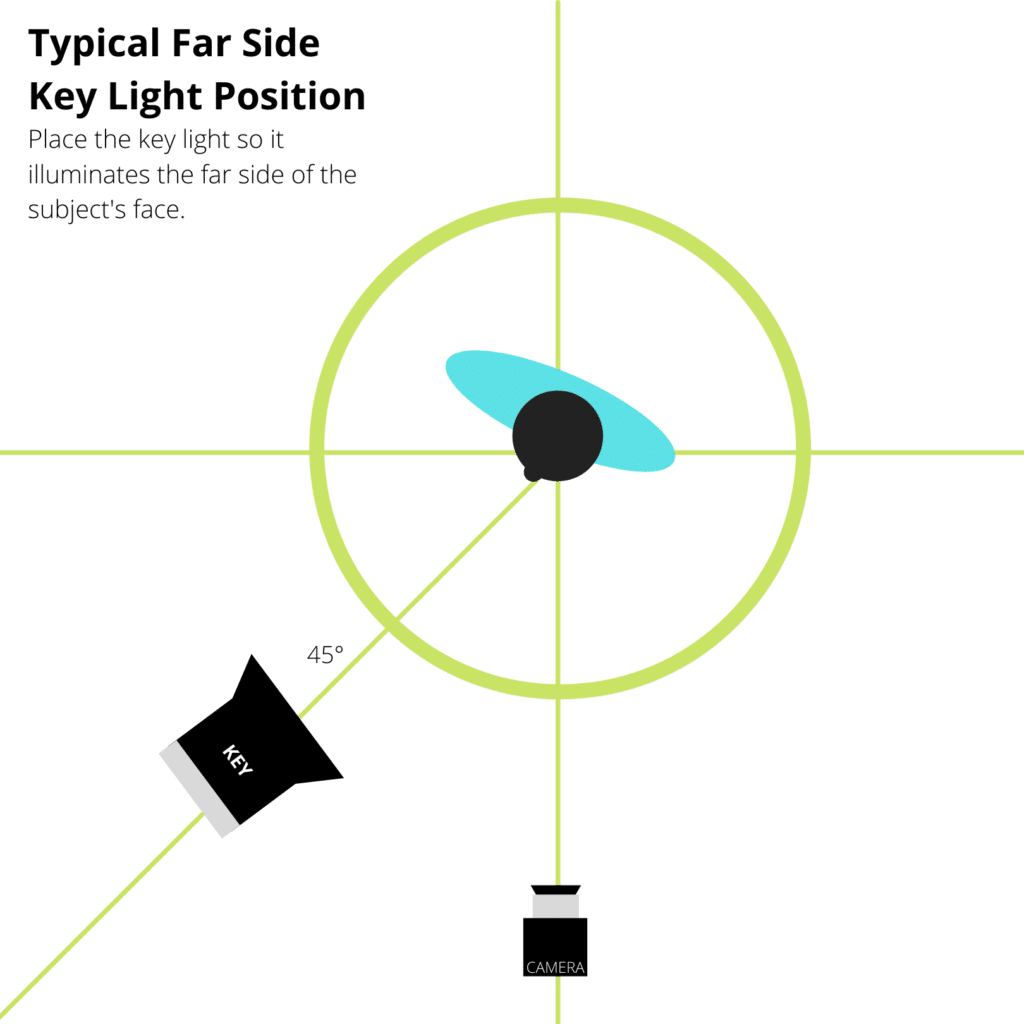
There is no right or wrong way to place the key. It all depends on what look you’re going for. The classic key light placement is 45° to the side of the main subject with the side of the face closest to the camera being the shadow side.
FILL LIGHT
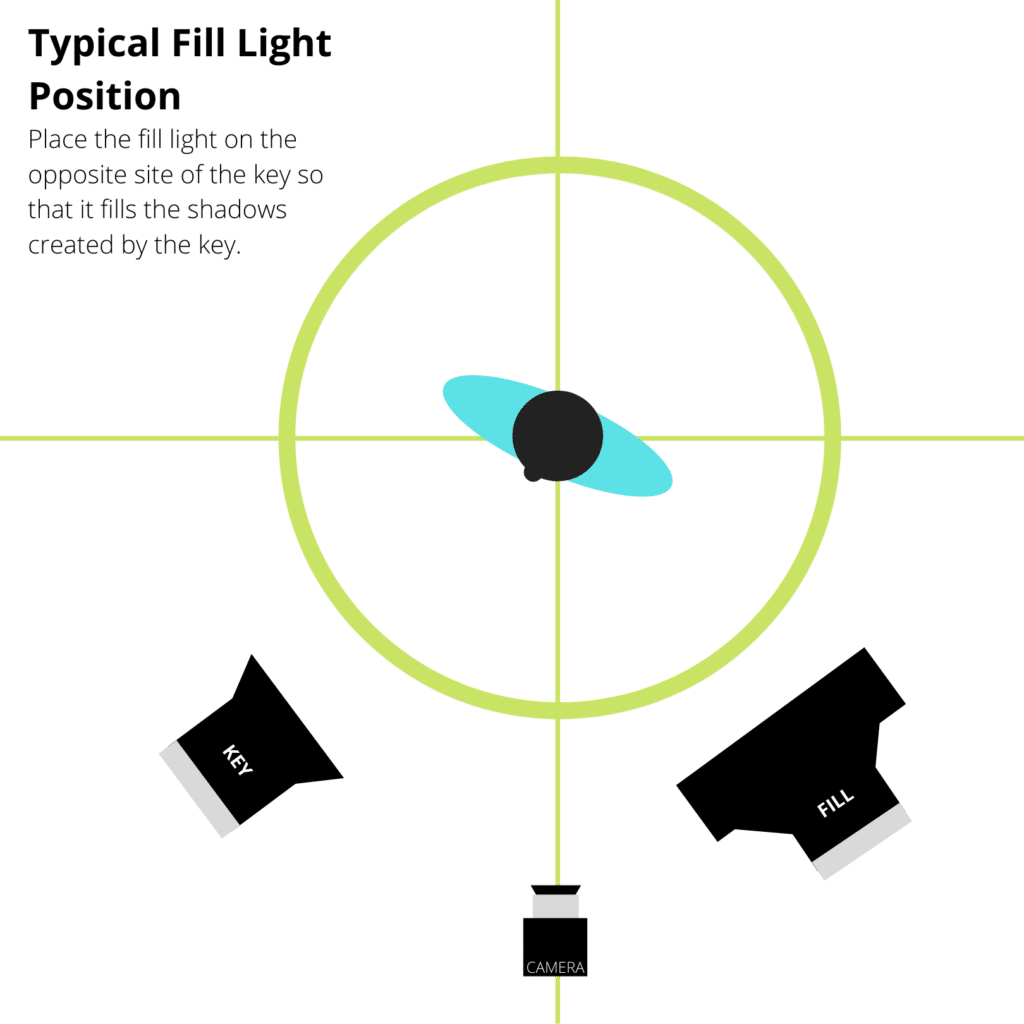
Your fill light is the light that decreases (fills) and shapes the shadows created by the KEY light.
Where you place your key will affect the shadows on the subject and within the scene. If you want to have a nearly shadowless look, then your fill light will be the same intensity as the key light and will fill in the shadows.
But in most cases, you want some contrast.
To create lighting with more contrast then you’ll want your fill light to be less intense. The greater the difference between the key side and the fill side, the higher the contrast of the look.
If you want an extremely high contrast look you might not even have a fill light or you might just bounce some of your backlight into the subject’s face as a very soft fill light.
BACK LIGHT
Your backlight is pretty simple. It’s a light that’s up and behind the subject.
If you can hang your light then it might be directly behind the subject. But if you need to have your light on a stand (as many of us do) then it might be more back and to the side (3/4 back position).
What’s the purpose of this light?
The number one reason we use a backlight is to create separation between the subject and the background.
Without a backlight, the subject and the background will often blend into each other.
A backlight is directed towards the subject’s back of head and shoulders. It touches their hair and creates a pop of brightness that adds texture to the hair, separates the subject from the background, and creates depth.

LIGHTING TRIANGLE
When you combine these three lights, you get a triangle.
You can combine this triangle in any manner of ways. But one common way to light a scene is to have your key lighting up the side of the face that is furthest from the camera (FAR SIDE LIGHTING). Then place your fill on the opposite side. Next place your backlight in the 3/4 back position opposite the KEY light.
That’s just one option. You should experiment with placing your key and fill in various positions to see how it affects the look and feels.
MY TOP 2 FILM LIGHTING SECRETS
If you’re like any other normal emerging or pro filmmaker, I know that lighting is something you’ve struggled with on some of your shoots.
Every early-stage filmmaker gets to a point where they realize the only way to dramatically improve their footage and have more shooting options is to master lighting. Hell, not even master it, just get pretty good at lighting.
The thing is, there’s a lot of confusing, complicated, and dogma-filled lighting tutorials online that can easily send new filmmakers astray.
Seriously, if you go onto YouTube to watch lighting tutorials, your main takeaway will probably be that you need to buy an Aputure c100.
Lighting brands have gotten pretty savvy with their marketing these days and are sponsoring A LOT of the content in the lighting space right now.
So anyway, since I’ve built a healthy filmmaking business without spending thousands on lights, I would like the same for you. I have two secrets. Well, for industry pros these aren’t secrets. But for emerging or aspiring filmmakers they are. So if that’s you…keep reading!
LIGHTING SECRET #1
I rent expensive lighting rather than buying it, which means I can afford to create incredible lighting looks at a fraction of the cost.
Sure, I own lights.
But my lighting kit is simple and inexpensive because I’m not lighting massive sets. I’m in small locations, working solo, working quickly, and keeping it simple.
If I’m doing something special that needs lots of power or a particular look, then I rent. In other words, the project budget covers the lighting, not my personal bank account.
And I started renting within my FIRST YEAR of solo filmmaking. Because I knew that doing so would boost my work way faster than anything else.
LIGHTING SECRET #2
I use foundational lighting techniques to maximize daylight and available light to tell a story with my lighting.
You can use the light you have available and bend it to your needs if you know practical lighting techniques. Using reflectors, bounce boards, practical lamps, and sunlight in combination with strategic placement of your subjects and talent is a simple way to dramatically improve your lighting.
So, to get you started with cinematic lighting here’s a lighting guide:
I spent the first few years of my filmmaking journey totally confused and quite frankly anxious about lighting. I felt like a filmmaking fraud because I really didn’t know why light behaved the way it did or how I could get it to do what I wanted.
And renting lights always felt overwhelming.
But then a few things happen.
First, I started studying lighting. Then, I did two short film shoots with people who were more “pro” than me. And I realized I knew more about lighting than they did.
People who had gone to film school didn’t seem to actually know how to light a scene!
I was flabbergasted. And, I ended up designing the lighting and making sure everything worked. And while all of this was going on my lighting abilities were getting better, my confidence was increasing, and I was raising my client rates. I can directly attribute the fact that I’ve increased my rates by 2000% over the past few years to my increased lighting skills.
No, that’s not a typo. I charge 20x what I did when I started out. And that’s common for most filmmakers who learn how to light a scene well AND tell a story with their lighting.
Funny thing is that doing this isn’t crazy hard or even expensive.
It just takes commitment and a willingness to be a little uncomfortable during the learning process. And yes, it helps if someone explains stuff to you properly. Beware dogmatic and unclear online tutorials!
It was not so long ago that I was STRUGGLING as a business owner and solo filmmaker. But that’s lighting for you. Yes, obviously, you MUST have good audio. You have to be able to tell a story. You need to know shot sequencing. And you’ve got to be able to edit effectively.
But lighting is something that can take your work from shaky to solid to pro.
What’s the main difference between footage that looks like it was shot by a beginner vs. a pro? Aside from stabilization and excellent framing, it’s the lighting, not the lens and the camera.
Don’t believe me?
💡 Try out some of the lighting techniques in the guide and see for yourself.
Learn Filmmaking and Get the Gear Guide
If you’re interested in learning filmmaking, check out the Solo Filmmaking Mentorship Program I created for aspiring filmmakers and video creators. It usually goes live once per year. So I recommend getting the Story Envelope Filmmaking letter which comes out a couple of times per month. That way, you can get filmmaking tips for free and find out when the filmmaking course is going live again.
Also, before you go, grab the Solo Filmmaking Gear Guide and Checklist for Beginners >>>

About the Author
Hi! I’m Colette Nichol. I’m a solo filmmaker and story strategist based out of rainy Vancouver, Canada. I’ve been making videos and micro films for small businesses and global brands since 2014.
Plus, I LOVE to help aspiring filmmakers pursue their dreams and start making films. This blog is designed to help you gain the knowledge you need to become a filmmaker.
If you want more, get on the waitlist for the Story Envelope Academy Solo Filmmaking Mentorship Program. It opens up one time per year and is the best way to become a filmmaking or video pro fast!
CLICK HERE to get on the solo filmmaking mentorship waitlist.
")