
Article by Colette Nichol, Story Strategist and Solo Filmmaker
In this post we’re going to cover three simple rules of filmmaking that absolutely everyone needs to know: the 180-degree rule, 30% rule, and 20-degree rule.
Learning these three rules of filmmaking is a great place to start if you’re an aspiring filmmaker or early-stage filmmaker.
Simple Rules, Powerful Results
It’s 6:24 in the morning on a very weird day.
A hummingbird buzzes around my geraniums then pokes her nose into the begonias and flits away.
In less than 10 seconds, my mood has been transformed from worried to delighted.
All because of something SIMPLE.
It works the same way in filmmaking.

It’s the simplest things that’ll transform the quality of your work from so-so to professional.
So let’s look at three rules of filmmaking that’ll change the way you think about setting up a shot. These three rules are powerful, yet simple:
- 30-degree rule
- 20% rule
- 180-degree rule
As you can see, in filmmaking, we like to keep the names of our rules simple too.
Table of contents
- 30 Degree Rule for Planning Your Shot List
- 20% Rule for Video Footage That You Can Edit Seamlessly
- 180 Degree Rule in Filmmaking
- 180 Degree Rule Breakdown
30-Degree Rule for Planning Your Shot List
The 30-degree rule relates to the position of the camera from shot-to-shot.
This rule states that to cut from one shot to the next, you need to make a 30-degree change in the position of the camera.
If everything else in the shot remains the same i.e. the focal length, f/stop (or t-stop), shot size, and shot angle stay the same, you have two options.
- You change the position of the camera by 30 degrees to create two separate shots that can be cut together seamlessly.
- You go with a jump cut, which is an abrupt cut where the edit is NOT seamless. Be warned: using a jump cut will work in a music video or some brand videos, but it’s not going to fly in a romantic drama.
Move your camera 30 degrees to get shots that’ll cut together in your film.
This 30-degree rule is why you sometimes see weird shots of the side of a subject’s head in the middle of a front-facing interview. The Director of Photography (DP) has set up a second camera to catch the subject from the side.
(I don’t recommend this option, by the way. There are much better options than filming the side of someone’s head in an interview!)
The 30-degree rule should also be considered a minimum, not a maximum.
At a bare minimum, you’ll need to move the camera 30 degrees if you want Shot A to cut together with Shot B.
But again, this only applies if you’re not changing anything else. If you’re not changing the shot size, shot angle, f-stop, or focal length, then you MUST change the camera position. Unless, of course, you’re making a stylistic choice to use jump cuts.
20% Rule for Video Footage That You Can Edit Seamlessly
This rule is related to the overall look of the shot.
This rule states that to cut from one shot to the next, there needs to be a 20% difference between the two shots.
This difference in shots could come from the following:
- camera angle
- shot size or proximity to the subject
- focal length of the lens
- f-stop/t-stop
- lighting and time of day
It could be a mix of a few different things that make one shot different from the previous shot.
Just like the previous rule, 20% is considered a bare minimum.
If you want to make sure your shots can be cut together, aiming for a much more significant change is better. If you’re focusing on visual storytelling, you’ll naturally have a much more significant change anyway.
But this is a good rule to remember if you’re not sure your shot list is going to give you cuttable footage.
🌟Related Post: Story Circle: 8-Step Storytelling Guide Based on the Hero’s Journey
These Shots Are More than 30% Different
So even though they are all filmed from the same camera position and angle, they would cut together seamlessly as long as the action matched up.


180-Degree Rule in Filmmaking
This final rule is one that trips up almost every single newbie filmmaker.
I’m not going to pretend it didn’t confuse the heck out of me a few years ago. It did. But, like riding a bicycle, once you get it, you can’t un-get it.
This rule is about the continuity of action.
The 180-degree rule states that there is a plane of action that the camera must not cross if you want to maintain the visual continuity of the scene.
Let’s break this down with an example I got from Blaine Brown’s book on cinematography. I’m using my own words, but this is his example.
180-Degree Rule Example
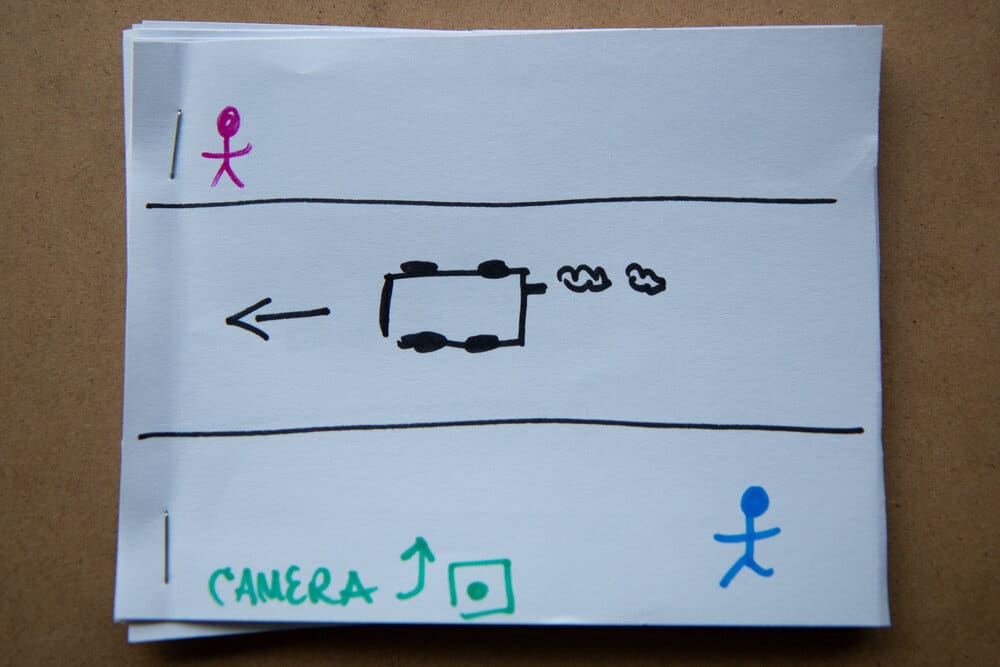
You’re watching a movie, and you see a scene with two people on the street in a wide shot.
A car is driving across the screen, heading from right to left. In screen language, this means the car is heading WEST.
The woman is on the left side of the screen, on the north side of the street.
The man is on the right side of the screen, on the south side of the street.
The camera is behind the man. Probably on somebody’s lawn.
One more time:
- The woman is on the left on one side of the car.
- The man is on the right on the other side of the car.
- The car is heading WEST.
The plane of action is the car. It’s the object that’s in directional motion.
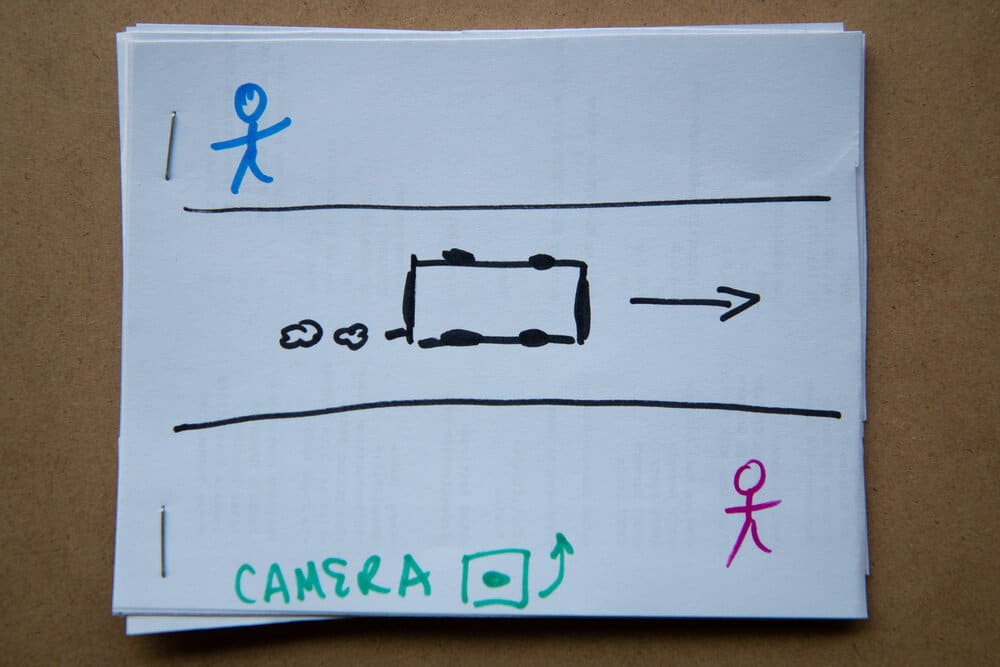
If you jump across the plane of action—to the other side of the street— what happens?
You set up the camera, and now you’re filming the car from behind the woman.
Think about it for a second…imagine the shot.
What direction does the car move if you’re looking through your camera’s viewfinder?
Everything will be reversed.
- The car will be heading EAST.
- The woman will be on the right.
- The man will be on the left.
180-Degree Rule Breakdown
Look at the first image and imagine yourself crossing the street and setting up your camera on the other side.
What happens?
That’s right—the screen direction of the car is reversed. And your subjects are on the wrong sides of the screen!
Cross the Plane of Action at Your Own Risk
If you cross the plane of action in the middle of a scene without the use of continuous camera movement, you’ll create a jump in reality that’ll confuse the audience.
You can create camera movement by using a gimbal, steady-cam or dolly move to chart the motion across the plane. This continuous action would create visual continuity and prevent confusion.
Visual continuity is necessary if you want to keep your audience inside the story.
Typically there are only two times crossing the “LINE” or Plane of Action will work.
1) If you do so with continuous motion
2) You do it to show a change in perspective or point of view.
Imagine you’re in a wide two-shot with two people running towards the camera.
You jump behind them (which reverses their position) to show what they’re running towards. This works because the shot is entirely different, and you’re showing their point of view.
Usually, where filmmakers get messed up is when they’re shooting a scene of two people talking, and they go in for over-the-shoulders medium shots.
They move the camera across the line and later discover in the editing room that their shots won’t cut together logically.
This is what happens when you “cross the line.”
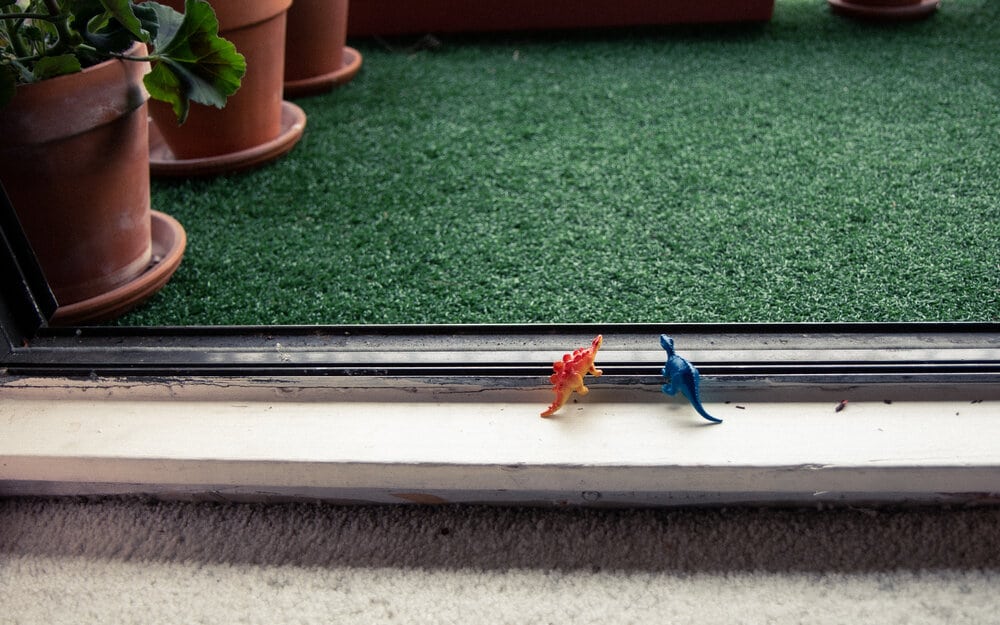
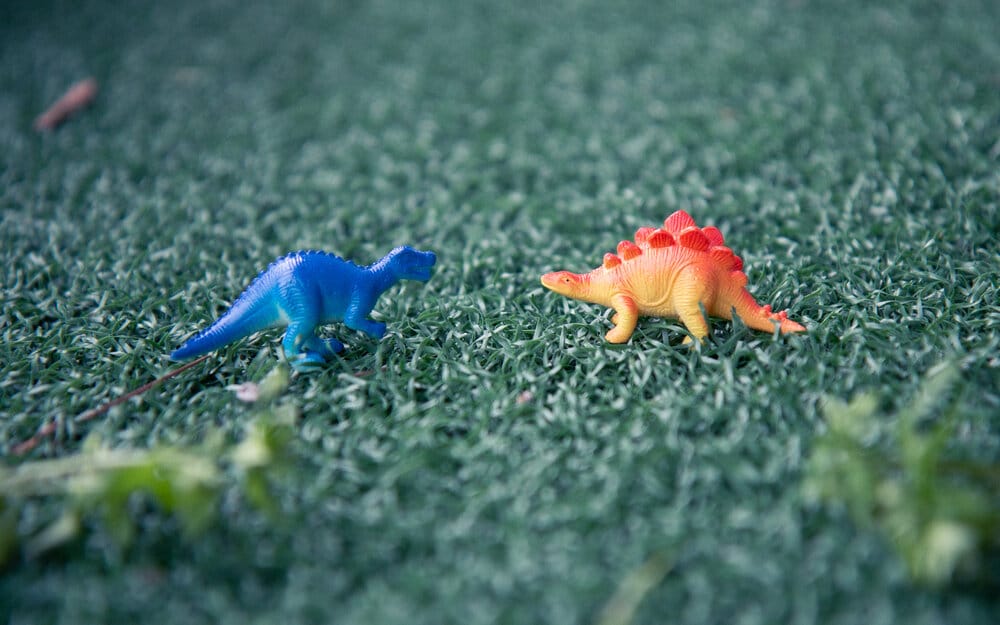
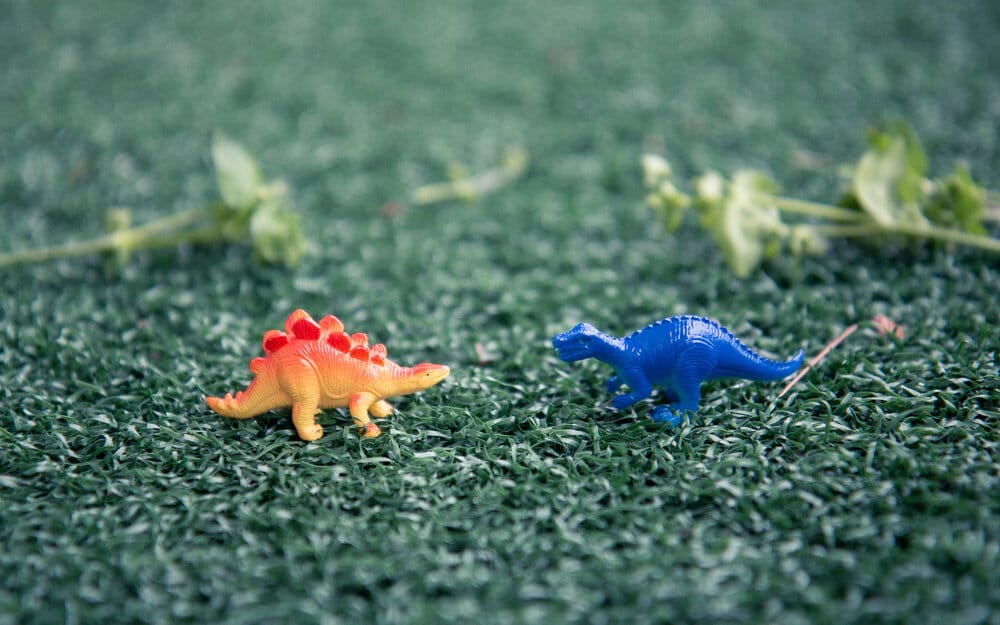
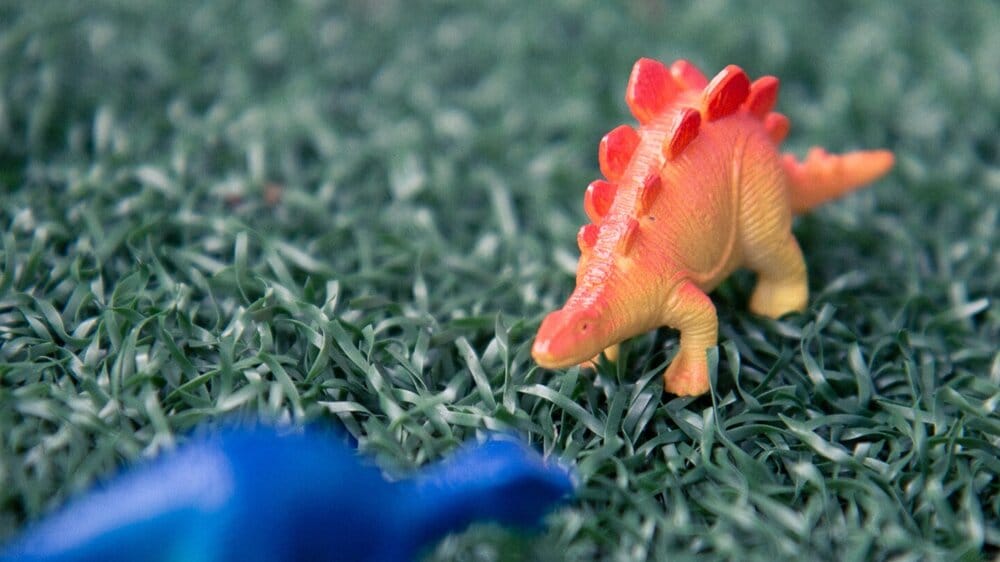
In the first image, the blue dino is on the left and the weeds are in front of them.
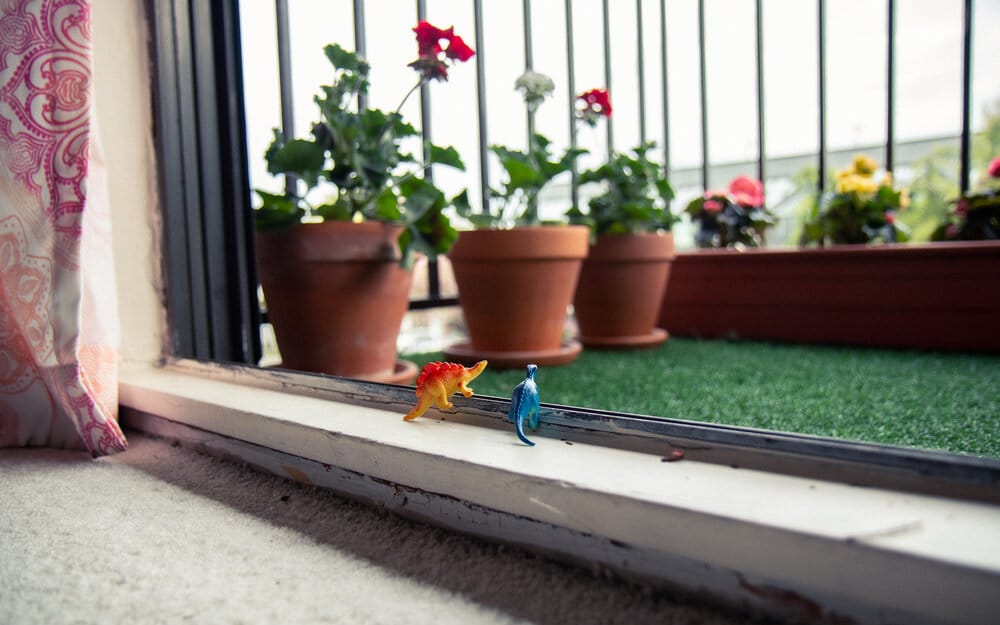
Then the camera crossed to the other side to film them. Now the blue dino is on the right. He’s jumped from one side of the screen to the other.
Not good! That’s confusing for the audience.
In this case, the plane of action is where the two dinos are standing.
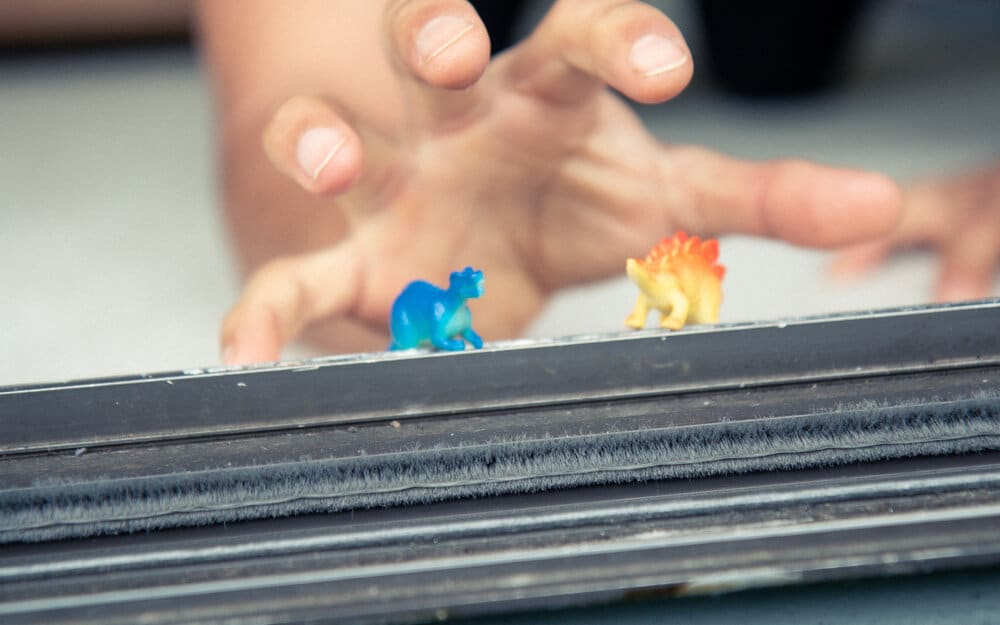
This is what happens when you cross the line when shooting dialogue…
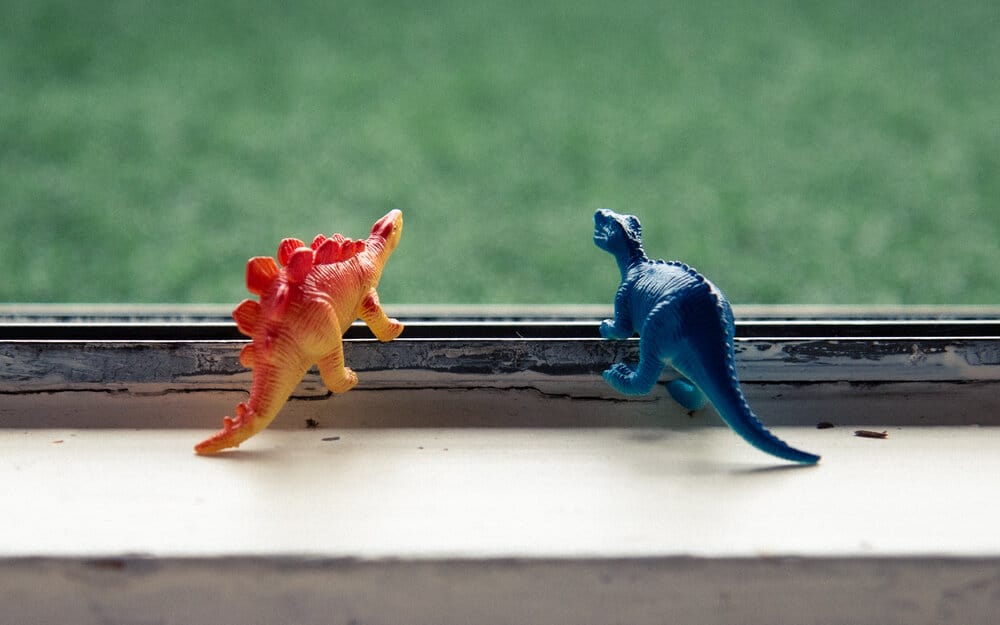
Okay, look…all I’ve got to demo this is two dinosaurs.
So it might not be the clearest.
When filmmakers go to shoot an over-the-shoulders medium shot of one actor, they sometimes cross the plane of action by mistake. When they get to the edit suite they find that their actors aren’t on the same side of the screen anymore.
When shooting over-the-shoulder shots, make sure you don’t jump to the other side of the actors.

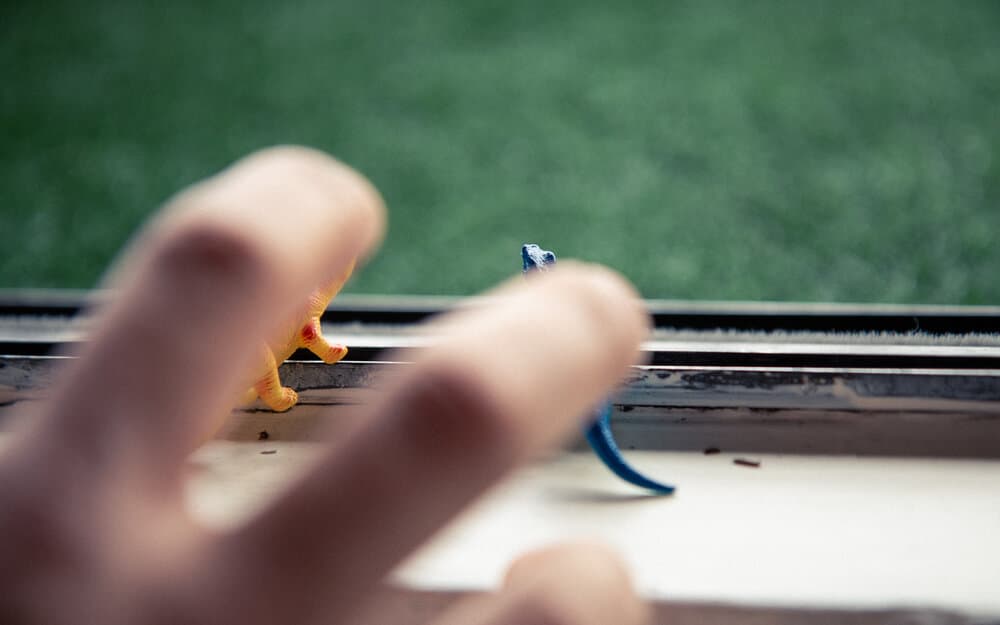
But wait! You can cross the line sometimes…
With these three shots, we start behind the two dinos, looking out at the patio.
Then we cross the line. We see what’s behind them. A hand! Oh no! (Notice the Dutch Angle.)
Then we jump behind them again to see them getting snatched up.
These shots indicate a change in perspective and are wildly different, which is why they aren’t confusing.

3 Simple Rules of Filmmaking
These three super simple rules will transform your footage and prevent editing nightmares from ruining your films.
Change your camera position by a minimum of 30 degrees if you want your shots to cut together. Ensure your shots are a minimum of 20% different from each other to guarantee cuttability in the edit suite. And watch out for the plane of action. If you’re going to cross the plane of action, then make sure you’re doing so with continuous motion or to completely change the perspective of the scene.
Let’s Talk Movie Magic
A hummingbird beats its wings 70 times per second.
That’s why their wings always look blurry. Of course, it’s an illusion. Their wings aren’t actually blurry. But your eyes perceive them that way.
In a movie that’s shot at 24 frames-per-second, you see the image as one long continuous flow of motion. You don’t see 24 crisp and separate photos. 24 frames per second is the minimum your eyes need to create the illusion of a moving picture.
The world of filmmaking is full of rules that allow you to cultivate what some like to call movie magic.
But never forget the real purpose of these rules. What’s that? Following these rules allows you to wrap your audience up in the warm embrace of a story.
It’s your job to stop your audience from getting pulled out of your film because they’re distracted by technical flaws.
If you can keep them IN the story, you have a better chance of taking them on an emotional journey that matters.
Sue Monk Kidd, once wrote, “Stories have to be told, or they die, and when they die, we can’t remember who we are or why we’re here.”
I’d like to add that stories have to be heard and felt, otherwise, we can’t remember who we are or why we’re here.
Related Filmmaking Articles
➩ How I Got Paid to Learn Documentary Filmmaking
➩ How to Capture Attention in the First 2 Seconds of a Video
➩ How To Get (Beautiful!) Blurry Backgrounds For Your Photos and Videos
➩ The 10 Elements of a Good Story for Video, Marketing, and Everything Else
➩ The Definitive Guide to Manual Exposure for Photo and Video
➩ Filmmaking Tools: It Might Be You…Or It Might Be Your Tools
Learn Filmmaking and Get the Gear Guide
If you’re interested in learning filmmaking, check out the Solo Filmmaking Mentorship Program I created for aspiring filmmakers and video creators. It usually goes live once per year. So I recommend getting the Story Envelope Filmmaking letter which comes out a couple of times per month. That way, you can get filmmaking tips for free and find out when the filmmaking course is going live again.
Also, before you go, grab the Solo Filmmaking Gear Guide and Checklist for Beginners.

About the Author
Hi! I’m Colette Nichol. I’m a solo filmmaker and story strategist based out of rainy Vancouver, Canada. I’ve been making videos and micro films for small businesses and global brands since 2014.
Plus, I LOVE to help aspiring filmmakers pursue their dreams and start making films. This blog is designed to help you gain the knowledge you need to become a filmmaker.
If you want more, get on the waitlist for the Story Envelope Academy Solo Filmmaking Mentorship Program. It opens up one time per year and is the best way to become a filmmaking or video pro fast!
CLICK HERE to get on the solo filmmaking mentorship waitlist.
")